Use Windows 8 Hyper-V to migrate an OS from a physical machine

Disk2vhd v1.63

Disk2vhd is a utility that creates VHD (Virtual Hard Disk – Microsoft’s Virtual Machine disk format) versions of physical disks for use in Microsoft Virtual PC or Microsoft Hyper-V virtual machines (VMs). The difference between Disk2vhd and other physical-to-virtual tools is that you can run Disk2vhd on a system that’s online. Disk2vhd uses Windows’ Volume Snapshot capability, introduced in Windows XP, to create consistent point-in-time snapshots of the volumes you want to include in a conversion. You can even have Disk2vhd create the VHDs on local volumes, even ones being converted (though performance is better when the VHD is on a disk different than ones being converted).

The Disk2vhd user interface lists the volumes present on the system:

It will create one VHD for each disk on which selected volumes reside. It preserves the partitioning information of the disk, but only copies the data contents for volumes on the disk that are selected. This enables you to capture just system volumes and exclude data volumes, for example.

Note: Virtual PC supports a maximum virtual disk size of 127GB. If you create a VHD from a larger disk it will not be accessible from a Virtual PC VM.

To use VHDs produced by Disk2vhd, create a VM with the desired characteristics and add the VHDs to the VM’s configuration as IDE disks. On first boot, a VM booting a captured copy of Windows will detect the VM’s hardware and automatically install drivers, if present in the image. If the required drivers are not present, install them via the Virtual PC or Hyper-V integration components. You can also attach to VHDs using the Windows 7 or Windows Server 2008 R2 Disk Management or Diskpart utilities.

Note: do not attach to VHDs on the same system on which you created them if you plan on booting from them. If you do so, Windows will assign the VHD a new disk signature to avoid a collision with the signature of the VHD’s source disk. Windows references disks in the boot configuration database (BCD) by disk signature, so when that happens Windows booted in a VM will fail to locate the boot disk.

Disk2vhd runs Windows XP SP2, Windows Server 2003 SP1, and higher, including x64 systems.

Here’s a screenshot of a copy of a Windows Server 2008 R2 Hyper-V system running in a virtual machine on top of the system it was made from:

(click image to zoom)


Command Line Usage

Disk2vhd includes command-line options that enable you to script the creation of VHDs. Specify the volumes you want included in a snapshot by drive letter (e.g. c:) or use “*” to include all volumes.

Usage: disk2vhd <[drive: [drive:]…]|[*]> <vhdfile> Example: disk2vhd * c:\vhd\snapshot.vhd

Note: Physical-to-virtual hard drive migration of a Windows installation is a valid function for customers with Software Assurance and full retail copies of Windows XP, Windows Vista, and Windows 7. Software Assurance provides users valuable benefits—please contact Microsoft Corporation for further information. Windows XP, Windows Vista and Windows 7 installed by Original Equipment Manufacturers (OEM) using OEM versions of these products may not be transferred to a virtual hard drive in accordance with Microsoft licensing terms.


Download

Download Disk2vhd (811 KB)


Run Disk2vhd now from Live.Sysinternals.com.

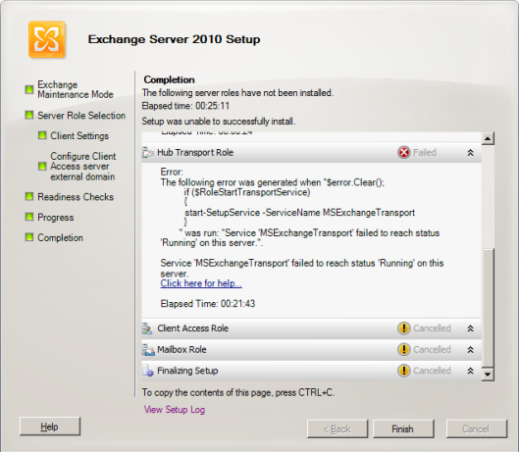
Service ‘MSExchangeTransport’ failed to reach status ‘Running’ on this server

Image

When you try to install MS Exchange 2010 Sp1 or SP2 in windows server 2008 R2
you may face the below error (below screen shoot)
Also getting the error: Service ‘MSExchangeTransport’ failed to reach status ‘Running’ on this server.All drivers are loaded properly and everything else (IIS/DNS/AD) is working fine.

This problem caused because of disabling IPv6. After enabling IPv6 everything working fine.

Linux Topics – Tutorials

Misc: HP-UX Tips & Tutorials:

Quick Tips and Tricks

http://freelinuxtutorials.com/topics/

Resolving three common Exchange Server 2010 issues

Here are three of the most common issues with Exchange 2010 — including Outlook 2007 error messages, malfunctioning Web services and problems opening Exchange Management tools — and how to fix them.

Outlook 2007 & 2003 error messages:

Organizations using Outlook 2007 may receive one of the following error messages after migrating to Exchange Server 2010:

  • Cannot start Microsoft Office Outlook. Unable to open the Outlook window. The set of folders could not be opened.
  • Unable to open your default e-mail folders. The Microsoft Exchange Server computer is not available. Either there are network problems or the Microsoft Exchange Server computer is down for maintenance.
  • The connection to the Microsoft Exchange Server is unavailable. Outlook must be online or connected to complete this action.
  • Unable to open your default email folders. The information store could not be opened.
  • Outlook could not log on. Check to make sure that you are connected to the network and are using the proper server and mailbox name. The connection to the Microsoft Exchange Server is unavailable. Outlook must be online and connected to complete this action.

These errors occur because Exchange 2010 requires Outlook to connect using remote procedure call (RPC) encryption. If RPC encryption has been disabled, the connection will fail.

The easiest way to solve this problem is to enable RPC encryption at the group policy level. Begin the process by downloading the administrative template for Outlook 2007, then add the template to your domain controller.

After the template has been applied, open the Group Policy Editor and navigate through your policy to User Configuration -> Administrative Templates -> Classic Administrative Templates -> Microsoft Office Outlook 2007 -> Tools -> Account Settings ->Exchange. Double click on the Enable RPC Encryption setting and set it to Enabled.

Note: This procedure only works for Outlook 2007; there is a different process when enabling RPC encryption for Outlook 2003.

ActiveSync and OWA issues after an Exchange 2010 SP1 upgrade When you apply Service Pack 1 to Exchange Server 2010, you may find that various Web services fail to function properly.

The most common problems are that mobile users — especially those with iPhones– cannot download message content, OWA users cannot reply to or forward messages, and POP and IMAP users cannot receive incoming email.

All of these issues can be traced to a problem with the accepted domain configuration. You will typically discover that a default accepted domain does not exist, or that the domain name contains a space. To fix this problem, run the following Exchange Management Shell (EMS) command to see the current state of your accepted domains:

Get-AcceptedDomain | fl

If you need to remove a space from an accepted domain name, enter an EMS command that uses the accepted domain’s identity, as returned by the command above. The identity of my accepted domain, for example, is Brien Posey; my domain name is brienposey.com. Therefore, the appropriate command would be:

Set-AcceptedDomain –Identity “Brien Posey” –Name “brienposey.com”

Note: You may have to reboot your Exchange server for the change to take effect.

Problems opening Exchange management tools A seemingly simple act, such as opening the Exchange Management Console (EMC) or the EMS, can be problematic in Exchange 2010. The management tools may not open because they work differently in Exchange 2010 than they did in Exchange Server 2007. In Exchange 2010, the management tools use remote PowerShell connections, even if you open them locally. The tools will only open if Internet Information Server(IIS) is configured properly.

The most common management tool error message I’ve seen is:

Connecting to the remote server failed with the following error message: The WinRM client sent a request to an HTTP server and got a response saying the requested HTTP URL was not available. This is usually returned by a HTTP server that does not support the WS-Management protocol. For more information, see the about_Remote_Troubleshooting Help topic.

This problem almost always relates to an HTTP-binding issue. To fix the problem, you need to open the IIS Manager and ensure that the Hostname field is blank for the Port 80 binding on the default website.

There are numerous other issues that may also cause the Exchange management tools to fail to open, and you can find more resolutions on Microsoft’s Exchange Team website.

Moving users between BES servers using BesUserAdminClient tool

You can use the besuseradminclient.exe command line tool (BlackBerry Enterprise Server User Administration Tool Client – part of the BES Resource kit) to move users between BlackBerry servers.

The first step is to download and install BES Resource Kit. It can be installed on any server in your Domain – not only on BlackBerry servers.

Once you have it installed , launch the tool and run the following command to check if it is able to connect to the BAS server (BlackBerry Administration Service) or not.

BESUserAdminClient.exe -n BAS_Server -username Admin_User -password Your_Password -ad_auth -domain Domain_Name -status

Example: BESUserAdminClient.exe -n BASServer01 -username Jinesh971 -password P@ssw0rd91 -ad_auth -domain apc.company.jv.corp -status

Command to move a user: BESUserAdminClient.exe -n BASServer01 -username Jinesh971 -password P@ssw0rd91 -ad_auth -domain apc.company.jv.corp -u user@domain.com  -move -b SOURCE_BES -t TARGET_BES

Command to move multiple users: BESUserAdminClient.exe -n BASServer01 -move -i D:\BESMOVE\input.txt -o D:\BESMOVE\output.txt -username Jinesh971 -password P@ssw0rd91 -ad_auth -domain apc.company.jv.corp

Format of INPUT.TXT

-b,-t,-u
SOURCE_BES, TARGET_BES, user1@domain.com
SOURCE_BES, TARGET_BES, user2@domain.com

How Email Works ?

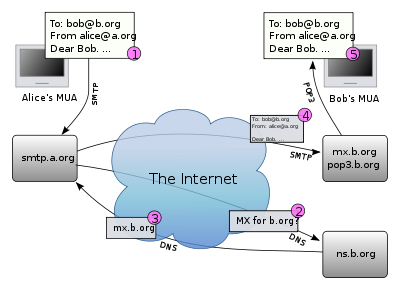
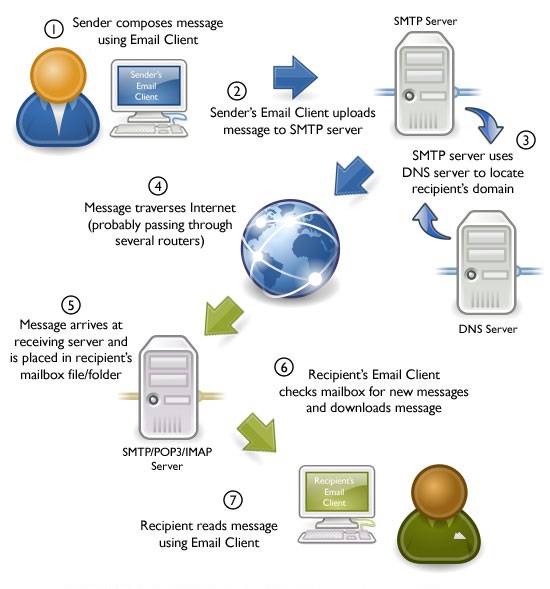
Email systems consist of computer servers that process and store messages on behalf of users who connect to the email infrastructure via an email client or web interface.

When someone sends an email, the message is transferred from his or her computer to the server associated with the recipient’s address, usually via a number of other servers.

In more detail ):

  1. User(zeeshan) sends an email message and connects to an SMTP (Simple Mail Transfer Protocol) server as configured in her email client or Mail User Agent (MUA).
  2. On the SMTP server, a Mail Transfer Agent (MTA) looks at the recipient address and looks up the domain part of the address to determine its destination.
  3. After querying a Domain Name System (DNS) server for the name of the Mail eXchanger (MX) for the recipient’s domain name…
  4. …the SMTP server will send the message to that server via the SMTPprotocol.
  5. The receiving server will store the message and make it available to the recipient (Adeel), who can access it via web, POP, or IMAP.

Here are few diagrams….


email works

how-email-works

How to migrate Windows 2003 Active Directory to Windows 2008 Active Directory—–Step by Step guide

Microsoft’s new baby in their server family is Windows Server 2008. The Windows Server® 2008 operating system ease operation of IT administrator and enterprise IT planner and designer. Windows 2008 Active Directory got improved roles, AD domain services, federation services, AD rights management services, compliances and BPA. Its time to shift to Windows 2008 Active Directory. In this article, I will show how to migrate from windows 2003 AD to windows 2008 AD.

On Windows Server 2003 DC, insert the Windows Server 2008 DVD, then open command prompt and change directory to  d:\sources\adprerp directory. Here D:\ is my dvd rom drive. In your case do as appropriate. note: you need to log on to windows 2003 domain controller as enterprise admin to run these command.

Now run following command   adprep/ forestprep 01 02 03

After finishing forestprep run adprep/ domainprep

04 05 

adprep/ rodcprep (Optional)

Install windows 2008 server and promote windows 2008 server as additional domain controller in windows 2003 forest

1 2

This is a trial version of windows 2008, I do not find any necessity to mention any cd key for this article. If you have proper cd key, you can mention here.

3 4 5 6

Windows 2008 will ask you to reset password for the first time. note: password complexity is enabled by default.

7 8

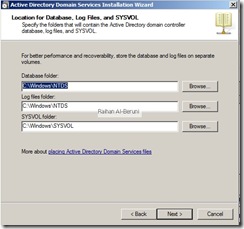
Now you have completed installing Windows 2008 machine. Log on as an administrator. Add active directory role in windows 2008 server. follow the screenshot as shown below

9 10 11 12 13 14 15 16 17 18 19 20 21

22

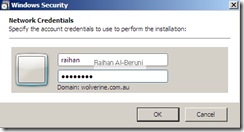
Mention your existing domain name, provide domain admin credentials to add this server to domain.

23 24 25 26 27 28 29 30

A restore password is required in case you need to restore AD.

31 32 33 34 35 36

Now restart windows 2008 server. It takes few minutes to replicate all AD container, AD object and DNS records. I would prefer to wait more then hours and see all the records are available in windows 2008 active directory. or you can force replicate all record if necessary.

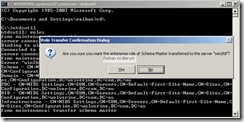
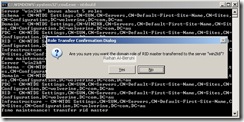
Now transfer all the FSMO roles from windows 2003 AD domain controller to windows 2008 AD domain controller. Log on to windows 2003 domain controller as enterprise admin. open command prompt type as follows:

ntdsutil

roles

connections

connect to server WIN2008SERVERNAME

q

Transfer domain naming master

Transfer PDC

Transfer Schema Master

Transfer RID master

Transfer infrastructure master

 06 07 08 09 010

011

Now you are ready to demod windows 2003 domain controller. log on to windows 2003 domain controller as domain admin . Open AD sites and services from administrative tools, expand default first site name, expand windows 2003 domain controller, right click on NTDS settings and go to properties. uncheck global catalog, click ok.

untitled

open run from start menu type dcpromo

37

39 

LEAVE THIS ABOVE BOX UNCHECKED, this will enable windows 2003 domain controller transfer all AD database to windows 2008 domain controller.

 38

Click next, provide password and follow next prompt, wait until demotion completed. Restart…. That’s all.

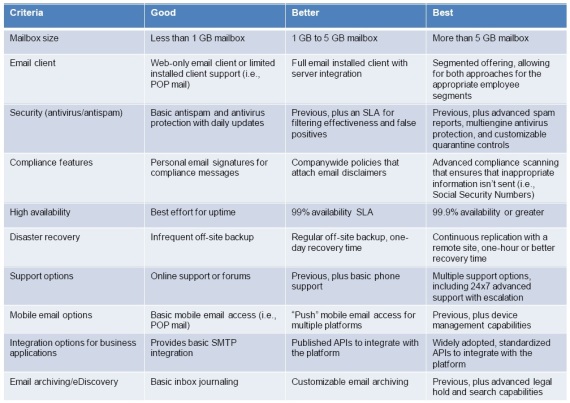
Ten Email criteria every company should consider

Ten Email criteria every company should consider

Exchange 2010: installation error

I experienced few errors while installing exchange 2010 on test bed. I reckon, I should share the resolution with you guys testing exchange 2010…

hub transport role fails to install

The execution of: “$error.Clear(); if($RoleStartTransportService) { start-SetupService -ServiceName MSExchangeTransport }”, generated the following error: “Service ‘MSExchangeTransport’ failed to reach  status ‘Running’ on this server.”

Cause: TCP/IP6 disabled or unchecked on TCP/IP properties of windows 2008 server.

Resolution:If you are not using tcp/ip6 then disable TCP/IP6 permanently to resolve the issue. To completely disable IPv6 on a Windows Server 2008, follow these steps:

  1. Start menu>run>regedit.exe>ok
  2. HKLM>system>CurrentControlSet>Services>tcpip6>parameters
  3. Right Click on Parameters>New>DWORD (64-bit) value
  4. Type DisabledComponents, and then press ENTER.
  5. Double-click DisabledComponents and then type 0xffffffff in Hexadecimal or 4294967295 in Decimal
  6. Reboot server

2007 Office System Converter: Microsoft Filter Pack

I have been given warning for 2007 Office System Converter pack not installed while prerequisite check before installation start.

Resolution: Download Office System Converter and install before proceed further.

Desktop Experience Features

I installed exchange 2010 on Windows 2008 R2. I have been given another warning for Desktop Experience feature not installed in server.

resolution: install desktop experience

Start menu>Administrative tools>Server Manager>Features>Add Features>follow installation screen

19

Transitioning from Exchange Server 2003 to Exchange Server 2010—-Step by Step

Step 1: Prerequisite

· Windows Server 2008 with Service Pack 2 or later or Windows Server 2008 R2 must be used for all servers running Exchange 2010 server roles or management tools

· .NET Framework 3.5 (Windows 2008 feature)

· Windows Remote Management 2.0

· Windows PowerShell v2 (Windows Server 2008 feature)

· Desktop Experience (Windows Server 2008 feature)

· Net. TCP Services started and set automatic (services.msc)

· Disable TCP/IP6 from Registry (if you use tcp/ip4)

· 2007 Office System Converter

· IIS for Client Access Role

· Active Directory Services Remote Management Tools (ServerManagerCmd –i RSAT-ADDS)

Step 2: Migrating from Windows 2003 AD Forest to Windows 2008 AD Forest

· Create user with domain admin, schema admin and enterprise admin role from existing AD

· Log on using new user name

· Run Dcdiag and Netdiag tools

· Bring the AD forest and domains to Windows Server 2003 Functional Level

· Insert Win2k8 Server DVD into Win2k3 DC

· Run following command from Command prompt

· d:\sources\adprep\adprep.exe /forestprep where d: is DVD ROM

· d:\sources\adprep\adprep.exe /domainprep /gpprep

· d:\Setup and select upgrade option to use existing DC

· Transfer FSMO Roles for a new Win2k8 DC with new Hardware

· Make one DC as GC

· Replicate AD database, GPO or wait tomstone to replicate

· Retire Windows 2003 DC

· Run DCPROMO (Uncheck this is last remaining DC)

· Raise new Domain Functional level to Win2k8

Step3: Transition from Exchange 2003 to Exchange 2010

· Bring the Exchange organization to Exchange Native Mode.

· Upgrade all Exchange Servers to Exchange Server 2003 Service Pack 2.

· Upgrade at least one Global Catalog domain controller in each AD site that will house Exchange Server to Windows Server 2003 SP2 or greater.

· Prepare a Windows Server 2008 (RTM or R2) x64 edition server for the first Exchange 2010 server.

· Install the AD LDIFDE tools on the new Exchange 2010 server (to upgrade the schema by running d:Exchange2010\Setup /PrepareSchema or Setup /ps)

· Run d:\Exchange2010\Setup /PrepareAD /OrganizationName:your_organisation_name from command prompt where D: DVD ROM

· Install any necessary prerequisites (WWW for CAS server role).

· Run setup on the Exchange 2010 server, upgrade the schema, and prepare the forest and domains. (Setup runs all in one step or separate at the command line eg.

D:\Exchange2010\Setup.com /mode:install /roles:H,C,M

· Install Client Access Server role servers and configure per 2010 design. Validate functionality.

clip_image001 ServerManagerCmd -i Web-Server

clip_image001[1] ServerManagerCmd -i Web-ISAPI-Ext

clip_image001[2] ServerManagerCmd -i Web-Metabase

clip_image001[3] ServerManagerCmd -i Web-Lgcy-Mgmt-Console

clip_image001[4] ServerManagerCmd -i Web-Basic-Auth

clip_image001[5] ServerManagerCmd -i Web-Digest-Auth

clip_image001[6] ServerManagerCmd -i Web-Windows-Auth

clip_image001[7] ServerManagerCmd -i Web-Dyn-Compression

clip_image001[8] ServerManagerCmd -i NET-HTTP-Activation

clip_image001[9] ServerManagerCmd -I RPC-over-HTTP-proxy

clip_image001[10] ServerManagerCmd –I Web-Server Web-ISAPI-Ext Web-Metabase Web-Lgcy-Mgmt-Console Web-Basic-Auth Web-Digest-Auth Web-Windows-Auth Web-Dyn-Compression NET-HTTP-Activation RPC-over-HTTP-proxy –Restart

· Transfer OWA, ActiveSync, and Outlook Anywhere traffic to new CAS servers.

· Install Hub Transport role and configure per 2010 design (New internal/external SMTP connector)

· Transfer inbound and outbound mail traffic to the HT servers.

· Install mailbox servers and configure Databases (DAG if needed).

· Create public folder replicas on Exchange 2010 servers using Exchange 2010 Public Folder tool.

· Move mailboxes to Exchange Server 2010 using Move Mailbox Wizard or PowerShell.

· Re-home the Offline Address Book (OAB) generation server to Exchange Server 2010.

· Re-home the public folder hierarchy on the new Exchange Server 2010 admin group.

· Transfer all Public Folder Replicas to Exchange Server 2010 Public folder store(s).

· Review and verify Installation log, events, Exchange related Windows services, server roles

· Test Mail Flow, public folder, webmail, outlook config

· Run BPA

· Delete Public and Private Information Stores from Exchange 2003 server(s).

· Delete Routing Group Connectors to Exchange Server 2003.

· Delete Recipient Update Service agreements using ADSIEdit.

· Uninstall all Exchange 2003 servers and remove from domain.

Tools to use:

Dcdiag

Netdiag

Repadmin

Replmon

Ntdsutil.exe

ADSIEdit

Exchange Management Console

Further Help:

Microsoft Technet

Keywords: FSMO, Exchange 2010, Exchange 2003, Exchange Server Roles, Windows Server 2008, Windows Server 2003

Important Warning: I am talking about messaging technology. It could be heart of your organization. So Prepare a test lab that simulate your circumstances and fit in your organisation. I created this instruction in a VMware lab environment. Visit TechNet web site to learn more about Exchange 2010 before you deploy in production environment.

Cheers & Good Luck.